
|
|
These directions are for the "standard" Kiev 88 magazine, NOT the newer NT magazines, which hinge open. If these directions are followed carefully, you will avoid frame spacing problems: overlapping frames, and also too widely spaced frames, which can result in losing a portion of the last negative on the roll. The above assumes there are no mechanical problems with either the magazine, or camera body. |
|
Step 1
Make sure that the color coded cocking indicator windows located on the right side of the magazine and body show WHITE indicating that both the camera and magazine are COCKED. (indicated by the blue arrows in the picture to the right) For instance, if the camera body shows a white flag and the body red, fire the shutter, and mount the magazine on the body, and cock the shutter- both flags should now be white. |

|
|
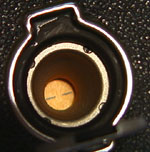
Step 2
The frame counter window on the magazine should show NO number- it should be black. (shown by the green arrow in the picture above) If it is not, cock and fire the shutter until NO NUMBER appears. This is the starting point-this is important. |
|
Step 3
It is not necessary, but it may help to remove the film magazine from the camera body before loading it with film. To remove the magazine, slide the locking button to the right. (shown by the red arrow) The magazine will be released from the camera body. (blue arrow) Some people also find it helpful to remove the dark slide from the magazine before loading film. But again, this is not a necessary step. |

|
|
Step 4
Lift the roll holder lock on the left end of the magazine, and turn it conter-clockwise as far as it will go. |

|
|
Step 5
While holding the lock in the full counterclockwise position, pull the roll holder out of the magazine housing. |

|
|
Step 6
Insert a roll of film into the feed position, and pull out a couple of inches of leader. |

|
|
Step 7
Pull the leader back and across the the magazine's pressure plate. Make sure that the colored side of the leader is against the pressure plate, and the black side is facing away, or toward you, and the edge of the paper is under the chrome lip at the edge of the pressure plate. (red arrow) |

|
|
Step 8
Put the end of the leader into the slot of the takeup spool. |

|
|
Step 9
Turning the spool towards you, wind 2-3 turns of paper around the spool, MAKING SURE that the paper is feeding on STRAIGHT- not overlapping, or crumpling against the ends of the spool, and is TIGHTLY WRAPPED. |

|
|
Step 10
Keeping the paper tight, pull a bit more paper off the feed roll until the spool can be installed in the takeup position. The knurled knob can be turned to help the film drive keys seat into the slots in the end of the spool. The roll holder is now ready for reinstallation into the magazine housing. |

|
|
Step 11
Holding the roll holder lock in the full counter-clockwise position, insert the roll holder into the housing. If the roll holder will not seat completely, lift one of the wings of the folding film winding key located on the opposite end of the housing, and turn it a click or two, until the roll holder slides fully home. The roll holder lock must be held fully counterclockwise, or the holder will not seat. Turn the roll holder lock fully clockwise, and fold the key down to lock it. If you removed the dark slide before loading the film, now is the time to reinsert it into the magazine, making sure that the rolled portion of the slide that retains the handle faces the lens. |

|
|
Step 12
Open the viewing window located on the back of the magazine housing. You should see the colored side of the paper leader. Lift one wing of the winding key, if you not already done so, and turn it CLOCKWISE. |

|
|
Step 13
Continue to turn the winding key until the number 1 is centered in the viewing window. This takes a while, so be patient. |
|
|
Step 14
Close the viewing window cover, and then turn the film winding key COUNTER-CLOCKWISE as far as it will go, to reset the film counter to the number 1. This last step is VERY important. If you fail to do this, the counter will not advance as you take pictures and you will get erratic frame spacing. |

|
|
Remove the dark slide, and the camera is now ready for the first exposure. * * * * * * * When you have made the final exposure on the roll, recock the shutter, which readies the magazine for reloading. To unload the exposed film from the magazine, open the viewing window on the back of the magazine, lift one wing of the winding key on the right end of the magazine, and turn it CLOCKWISE until you cannot see any more of the backing paper through the window. The roll holder can now be removed from the magazine housing as noted in item 3 above, and the roll removed and sealed. Note: As the film advances, the numbers on the film backing paper will no longer line up if viewed through the viewing window on the back of the magazine. It is not necessary that they do so, as the mechanism of the magazine controls how far the film is advanced. If frame spacing is still too small or too wide after following these instructions, the magazine will require adjustment by an experienced camera repairman.
Version 1.4
|